Replacing E1000 with VMXNET3
Virtual Network Interface Cards (vNIC) are sometimes getting overlooked by virtualization administrators as for some it seems like they don’t matter much. Let’s see what happens after we switch good ol’ E1000 for VMXNET3 and what is the difference between the two.
E1000, VMXNET3 – what, why, which?
E1000, VMXNET2, VMXNET3 etc. etc. are virtual NIC (network interface card) types available to use within VMware ESXi/vSphere environment. If you’re wondering – VMware recommends to use the VMXNET3 Virtual NIC unless there is a specific driver or compatibility reason where it cannot be used. However in many cases, the E1000 has been installed, since it is the default NIC chosen during the VM creation and most of less-experienced virtualizarion admins don’t bother to change it.
Speaking of E1000, it is a software emulation of a 1 GB network card, commonly available on Intel based devices and most operating systems include built in support. Because of that there is no special driver required to make it operate in a virtual environment. The problem is that the virtual device is just as described, a piece of software acting as if it was hardware. That can lead to performance issues as the host’s CPU is required to take care of the processing normally done on a separate ASIC (Application-Specific Integrated Circuit).
VMware definition:
An emulated version of the Intel 82545EM Gigabit Ethernet NIC. A driver for this NIC is not included with all guest operating systems. Typically Linux versions 2.4.19 and later, Windows XP Professional x64 Edition and later, and Windows Server 2003 (32-bit) and later include the E1000 driver.
On the other hand, we’ve got VMXNET3 virtual NIC, which is a completely virtualized 10 GB NIC with drivers and network processing are integrated with the ESXi hypervisor. That means there is no additional processing required to emulate a hardware device and network performance is much better. There is no native VMXNET device driver in some operating systems such as Windows 2008 R2 and RedHat/CentOS 5 so VMware Tools is required to obtain the driver.
VMware definition:
The VMXNET virtual network adapter has no physical counterpart. VMXNET is optimized for performance in a virtual machine. Because operating system vendors do not provide built-in drivers for this card, you must install VMware Tools to have a driver for the VMXNET network adapter available.
Replacing E1000 NIC with VMXNET3 on production/live VM⌗
Having all that said, we can move onto the main subject of this post, which is replacing E1000 with VMXNET3 on a live (i.e. already existing) VM. This process can be pretty easy or very hard depending on the networking setup in your environment, however in most of the cases, it shouldn’t be too problematic for an experienced VMware admin.
The first step we need to take is to ask ourselves do we know everything about the current network settings in our environment and the VM in question. You have to keep in my mind we will be REPLACING a network card on it, not upgrading it. This means we WILL have to re-do the network configuration on the OS level (or at least make sure DHCP doesn’t screw us over) and double check which approach should we take (preserving or discarding the original MAC address).
In my example, we’re going to assume we’re working in an environment with MAC filtering setup on all network devices and no DHCP. This means we will have to make sure the MAC address stays the same after we replace the NIC and re-configure the network settings on the OS level after the change-over.
Let’s begin by gathering the current network configuration from the guest OS of the VM we’ll be replacing the NIC on. Obviously, you can skip that if you have all the details noted down already.
- Windows Systems – the easiest way to gather all network settings configured on the NIC is through Windows Command Line (CMD). Open it up by (if on desktop), by typing in “cmd” in the search box in the Start menu and pressing enter. The command we need to run now is:
C:> ipconfig /all
The above command will return something like this:
Ethernet adapter E1000-LAN:
Connection-specific DNS Suffix : paulwilk.net
Description : Intel<R> PRO/1000 MT Network Connection
Physical Address : 00-50-56-66-66-66
DHCP Enabled : No
Autoconfiguration Enabled : Yes
IPv4 Address : 10.0.0.100
Subnet Mask : 255.255.255.0
Default Gateway : 10.0.0.1
DNS Servers : 10.0.0.10
NetBIOS ober Tcpip : Enabled
As you can clearly see in the output above, the network configuration on this adapter is 10.0.0.100/24, gateway 10.0.0.10, DNS 10.0.0.10. You can also note down the MAC address, however this part is actually pretty easy to get from vSphere/ESXi, so there’s not really a need to do that now. - Linux/BSD/*nix Systems – network settings can be obtained from *nix systems in pretty similar fashion. The command which we need to run can be different on some distributions, but in most of the cases, all we have to do on a typical *nix system is to open up the terminal and run:
root@linux # ip address
root@linux # ip route
root@linux # cat /etc/resolv.conf
The first command will show us the IP address and the network mask of the interface:
1: eth0: <BROADCAST,MULTICAST,UP,LOWER_UP> mtu 1500 qdisc mq state UP group default qlen 1000
link/ether 00-50-56-66-66-66 brd ff:ff:ff:ff:ff:ff
inet 10.0.0.100/24 brd 10.0.0.255 scope global dynamic noprefixroute eth0
valid_lft 77008sec preferred_lft 77008sec
The second command will show us the current default gateway set on the OS:
default via<strong> 10.0.0.1</strong> dev eth0 proto dhcp src 10.0.0.100 metric 302
And the last command will show us the currently used DNS nameserver:
# Generated by resolvconf
nameserver <strong>10.0.0.10
In summary, we now know this VMs basic network configuration which is 10.0.0.100/24, gateway 10.0.0.1 and DNS 10.0.0.10. Again, you can also note down the MAC address, however this part is actually pretty easy to get from vSphere/ESXi, so there’s not really a need to do that now.
After getting the network settings off the VM, we can now focus on the NIC itself. Let’s log into the vCenter/ESXi host responsible for running that VM and open its control page.

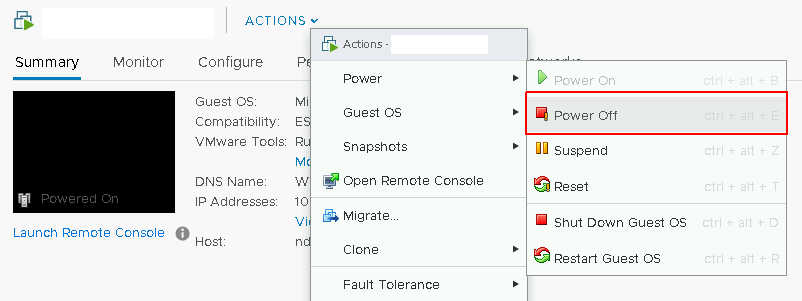
Firstly, we need to power down the VM. NIC replacement is a hardware level change which cannot be done while the machine is running. The easiest way to stop the VM is to click the stop button on the upper ribbon. If you’re concerned about your guest OS, you can also log into the VM and turn it down from within.
After the VM shuts down completely, open up its settings and navigate to the hardware tab. Expand the Network Interface to view the current card and its MAC address – here’s the part where we note it down for later.
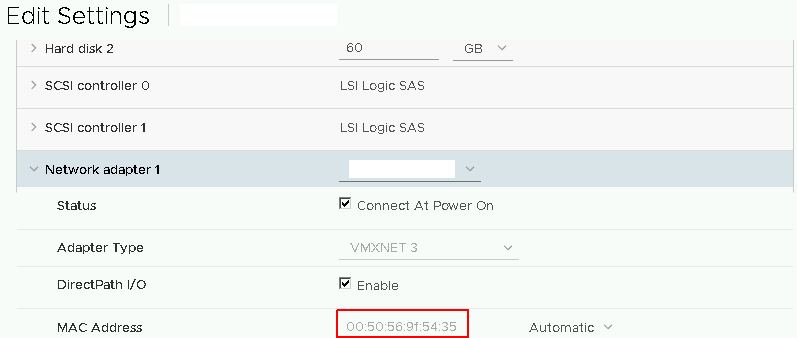
Click the ‘X’ button to remove the card from the VM.

Click “add new device” and select “network card”
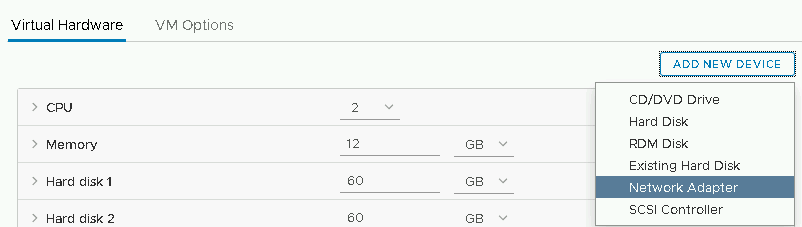
Expand the newly added card’s properties and select “custom” under MAC address. Now you can type in the missing 3 pairs to match the MAC of the card we removed previously.

Having that done, scroll a bit lower to see the NIC type selection menu. Select it and choose VMXNET3 from the list.

Save the settings and power up the VM. You can now log back into it and configure the new NIC with the network details of the previous card we’ve noted down earlier.