Homelab Part 1 - Nesting
As my move to Ireland was quite unexpected and unplanned, I had to sell my homelab. For the past few months I was a refugee, an outcast trying to get something done on an outdated laptop which I was jokingly referring to as mobile-lab. The decision was made to end this and get new gear.
The situation I was stuck in started changing few days ago as I finally got the time and resources to recreate a lab I used to have back in Poland.
In this series we’re going to take a look at the whole process of setting up this new lab – from setting up the hosts and a domain, through vCenter deployment to NSX & vROPS.
In today’s post – hosts! Three of them actually. One CentOS 7 Linux running KVM:QEMU and two VMware ESXi 6.5 VMs with nested virtualization enabled.
EDIT: I chose CentOS 7 and KVM:QEMU as the physical host OS to increase the level of “tinkering” in my lab. However, due to the amount of requests, I will also post an alternative “Part I” post with ESXi 6.5 as the physical host OS.
The host we are going to be working on in this series has 32GB of RAM, an Intel Xeon CPU and 300GB SSD.
1. CentOS 7 installation⌗
Installing CentOS 7 on the host machine is probably going to be the easiest part of our journey.
Firstly, we need to get a copy of CentOS 7 installation iso, which can be downloaded from the official CentOS project website
After downloading the .iso file, we can get in on either a DVD disk or USB. I prefer to always use USB sticks, but again – feel free to burn the .iso to a DVD disk if needed. Putting .iso file onto a USB drive and making it bootable can be done either using Rufus on Windows or dd command on Linux/OS X.
Once we get our CentOS installation media ready, we can start working on the host. To boot CentOS installation on my host, all I had to do was pressing ESC during POST and selecting the USB drive as a boot device, however depending on your motherboard, you might need to take some extra steps (enabling legacy boot, changing boot security settings etc.).
The installation itself is pretty straight-forward. If you’d like to follow my exact lab setup, please choose “Server with GUI” option on the software selection page and tick all virtualization packages (manager, hypervisor, client).
After the installation finishes, reboot your host and log into your CentOS system.
2. NIC teaming⌗
This step is actually optional. If you don’t have multiple physical NICs on your host, you can safely skip this. In my case, I had two NICs installed on my host. They were not providing my lab with any superb redundancy (as both of them were connected to the same switch), but this might change in the future.
To start setting up a team interface, we need to load a team driver and install teamd package.
[root@centos]# modprobe team
[root@centos]# yum -y install teamd
Next, create a file team0 in /etc/sysconfig/network/tools folder with the following:
BOOTPROTO=static
 TEAM_CONFIG='{“runner”:{“name”:”loadbalance”},”link_watch”:{“name”:”ethtool”}}’
 IPADDR=192.168.100.1
 NETMASK=255.255.255.0
 GATEWAY=192.168.100.254
 NAME=team0 DEVICE=team0
 ONBOOT=yes
 DEVICETYPE=Team
 PREFIX=243. Getting UEFI BIOS`
Remember to change the IPADDR, NETMASK and GATEWAY to whatever fits your network. You can also change the loadbalance variable to a different runner if needed. Here’s a quick summary of runners you can choose from:
- broadcast : transmits each packet from all ports.
- roundrobin : transmits each packets in a round-robin way from each of its ports.
- activebackup: failover runner which watches for link changes and select an active port for data transfer.
- loadbalance: monitor traffic and uses a hash function to try to reach a perfect balance when selecting ports for packet transmission.
- lacp : Implement the 802.3ad Link Aggregation Control Protocol. It can use the same transmit port selection possibilities as the loadbalance runner.
Create configuration files for your network interfaces. You can check their names by running ip addr command – mine turned out to be eth0 and eth1.
TEAM_MASTER=team0
 TEAM_PORT_CONFIG='{“prio”:99}’
 DEVICETYPE=TeamPort
 NAME=eth0
 HWADDR=52:54:00:44:11:aa
 DEVICE=eth0
 ONBOOT=yes</span></div><div></div><div style="padding-left: 30px;"><span style="font-family: 'couriernew',courier,monospace; font-size: 8pt;">**file: eth1**</span></div><div style="padding-left: 30px;"><span style="font-family: 'couriernew',courier,monospace; font-size: 8pt;">TEAM_MASTER=team0
 TEAM_PORT_CONFIG='{“prio”:100}’
 DEVICETYPE=TeamPort
 NAME=eth1
 HWADDR=52:54:00:44:11:bb
 DEVICE=eth1
 ONBOOT=yes
To finish setting up the team0 interface, bring it down and up again and restart the network service.
[root@centos]# ifdown team0;ifdown team0
[root@centos]# systemctl restart network
As an alternative approach, you can use nmcli to create teaming. Firstly run the command below to set team0 interface:
[root@centos]# nmcli con add type team con-name team0 ifname team0 ip4 192.168.100.1/24 gw4 192.168.100.254
Secondly, add both eth0 and eth1 as slaves to the team0 interface:
root@centos]# nmcli con add type team-slave con-name eth3 ifname eth0 master team0
[root@centos]# nmcli con add type team-slave con-name eth4 ifname eth1 master team0
3. Basic CentOS configuration⌗
Some things we need to configure before getting into virtualization (hostname & DNS):
[root@centos]# echo ‘kvm01’ > /etc/hostname
[root@kvm01]# echo ‘nameserver 8.8.8.8’ > /etc/resolv.conf
4. Enabling nested virtualization⌗
To activate nested virtualization (virtualizing hypervisors), run the following command:
[root@kvm01]# modprobe kvm_intel nested=1
Replace* kvm_intel with kvm_amd if you’re running off an AMD CPU.
This change will not be saved after a reboot. To enable nested virtualization permanently, you need to edit /etc/modprobe.d/kvm.conf file and change the following line:
options kvm_intel nested=1
Having this done, we can move onto some more exciting tweaks – enabling UEFI support for KVM.
Firstly, create a new repo file in etc/yum.repos.d/kraxel.repo with the following:
[qemu-firmware-jenkins]
name=firmware for qemu, built by jenkins, fresh from git reposbaseurl=https://www.kraxel.org/repos/jenkins/</span>
enabled=0</span>
gpgcheck=0
Afterwards, enable the newly added repository and install OVMF (Open Virtual Machine Firmware):
[root@kvm01]# yum –enablerepo=qemu-firmware-jenkins -y install OVMF
Next, edit the QEMU configuration file and replace line 682 with:
nvram = [
/usr/share/edk2.git/ovmf-x64/OVMF_CODE-pure-efi.fd:/usr/share/edk2.git/ovmf-x64/OVMF_VARS-pure-efi.fd”,
]
Restart libvirtd service to apply the changes:
[root@kvm01]# systemctl restart libvirtd
Update QEMU on your system and disable the repository:
[root@kvm01]# yum -y install centos-release-qemu-ev
[root@kvm01]# sed -i -e “s/enabled=1/enabled=0/g” /etc/yum.repos.d/CentOS-QEMU-EV.repo
[root@kvm01]# yum –enablerepo=centos-qemu-ev -y install qemu-kvm-ev
Restart libvirtd again to apply changes.
The last thing to do before moving on to the next step is to download the UEFI firmware itself.
[root@kvm01]# yum install edk2.git-aarch64 edk2.git-ovmf-x64
5. Setting up promiscuous mode on the team adapter⌗
Promiscuous mode in needed to enable nested virtual networking inside the nested ESXi environment. Here’s an official description of this mode:
By default, a guest operating system’s virtual network adapter only receives frames that are meant for it. Placing the guest’s network adapter in promiscuous mode causes it to receive all frames passed on the virtual switch that are allowed under the VLAN policy for the associated portgroup. This can be useful for intrusion detection monitoring or if a sniffer needs to analyze all traffic on the network segment.
To enable promiscuous mode on the team0 adapter, run the following commands (in any order):
[root@kvm01]# ip link set eth0 promisc on
[root@kvm01]# ip link set eth1 promisc on
[root@kvm01]# ip link set team0 promisc on
6. Nested ESXi VMs⌗
Finally, we can start setting up the ESXi VMs. To do so, open up the Virtual Machine Manager on your CentOS host and create a new VM.
In my environment, the ESXi VMs are named ESXi01 and ESXi02, however feel free to choose anything else.
Select local media install and the ESXi 6.5 iso from the local storage device.
OS Type and Version doesn’t really matter, so you can choose basically anything.
On the CPU/RAM page, select how many CPUs and how much RAM should this VM have access to. Remember ESXi 6.5 requires at least 4GB of RAM to install. I recommend setting up at least one ESXi VM with 10GB of RAM to make the installation of vCenter Server later on easier.
Create a new disk image. Again, the size doesn’t really make a difference, but for this example, we are going to go ahead with 100GB.
Next, remember to tick the option to customize the configuration before install and select e1000 with macvtap as the network adapter.
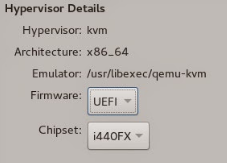
On the customization page, select UEFI as the VM’s firmware and press apply.
You can now safely clone the VM to create the third and final hypervisor in our little lab.

Here’s going to be a link to Part 2 at some point in the future.